Microsoft Copilot Studio empowers developers to create advanced chatbots within the Microsoft ecosystem. One key feature to enhance your chatbot’s adaptability and scalability is environment variables. These allow you to dynamically manage API keys, URLs, and custom settings without hardcoding values. In this guide, learn how to set up and use environment variables in Copilot Studio for seamless integrations and customizable chatbot experiences.
Why Use Environment Variables in Copilot Studio?
Environment variables are essential for scenarios where dynamic values are needed based on the environment. For example:
- External Links: Easily switch between staging and production URLs.
- API Keys: Securely manage sensitive keys.
- Custom Configurations: Adapt your Copilot behavior based on specific settings.
Rather than embedding static values directly, environment variables make it easy to reference and update these components dynamically.
How to Add Environment Variables to Copilot in Microsoft Copilot Studio
Step 1: Create Environment Variables
You cannot create environment variables directly in Copilot Studio. Instead, follow these steps:
- Open the Power Apps Maker Portal.
- Navigate to your solution.
- Click New → More → Environment Variable.
- Set up the variable with a meaningful name and value (e.g., an API key or URL).
Note: Once the variable is created, ensure it is refreshed in Copilot Studio.
Step 2: Refresh Copilot Studio
After creating the variables, ensure that your Copilot instance is up to date:
- Refresh the Environment: If the variable does not appear immediately in Copilot Studio, refresh the environment to sync changes.
- Verify that the new variables are accessible.

MASTER COPILOT STUDIO AGENTS
Get the 10 Commandments of Copilot Agents (Free)
Want to learn the Pro Tips of Copilot Agents? Get this free resource sent right to your inbox.
Step 3: Access Environment Variables in Copilot Studio
Once the environment variables are set up and refreshed, you can use them in your Copilot chatbot:
- Open a Topic: Navigate to the topic you want to modify in the Copilot Studio canvas.
- Add a Node: Insert a node for the desired action (e.g., condition, message, or custom connector).
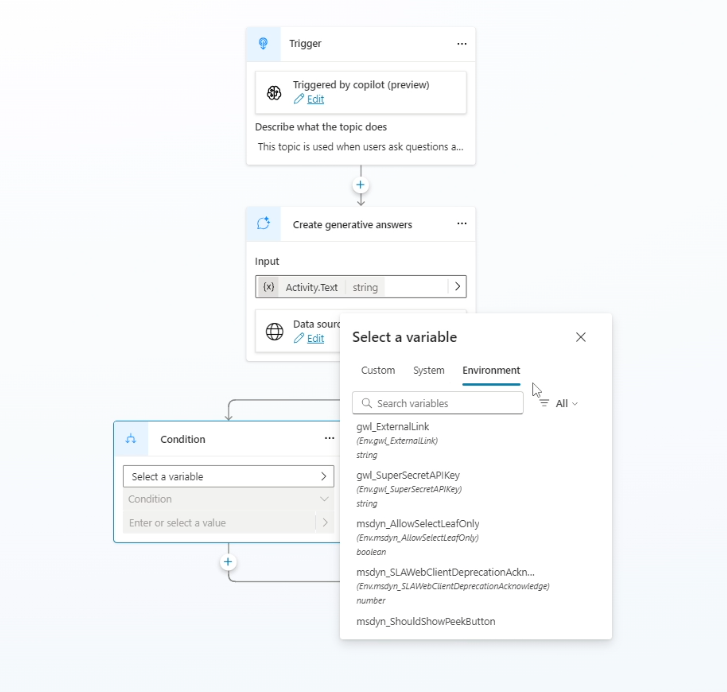
Step 4: Insert Environment Variables
Here’s how to leverage environment variables in various contexts:
- Conditional Logic:
- Use a condition statement to check values.
- Environment variables are listed alongside custom and system variables.
- Select the appropriate variable (e.g., “Super Secret API Key”).
- Message Responses:
- Use environment variables to dynamically populate chatbot messages.
- Click Insert Variable → Environment Tab to select and send the variable content as part of the response.
- Custom Connectors and Power Automate Flows:
- Pass environment variables as inputs to connectors or flows for seamless integration.
Practical Use Cases
- Dynamic Link Sharing: Send specific URLs based on the environment (e.g., staging vs. production).
- Custom Security Roles: Reference GUIDs for specific roles or permissions.
- Azure Integration: Use variables for Azure Content Safety Studio or other services to streamline configurations.
Pro Tip: Testing Environment Variables
Always test your chatbot after adding environment variables to ensure they are working as intended. Check for:
- Proper retrieval of variable values.
- Correct usage in conditions, messages, or flows.
In Conclusion
Environment variables in Copilot Studio are a game-changer for creating adaptive and secure chatbots. By centralizing dynamic values, you can build scalable solutions that simplify maintenance and improve flexibility. With a few setup steps in the Power Apps Maker Portal, you can unlock powerful capabilities in your Copilot chatbot.
Happy Developing!