In this tutorial, we will guide you through the process of filtering option sets on a form in Model-Driven Apps using JavaScript. For low-code developers, this technique offers a seamless way to customize and enhance user forms tailored to specific needs. Follow these steps to streamline your app’s user experience.
What You’ll Learn
- How to identify and create option sets in Model-Driven Apps.
- Writing and integrating JavaScript to filter these option sets.
- Configuring form events to use the custom script.
Why This Matters
Model-Driven Apps are an integral part of Microsoft Dynamics, helping organizations to automate processes and improve overall efficiency. Filtering option sets using JavaScript enables developers to build more intuitive and user-friendly forms, minimizing form clutter and enhancing app usability.
Step-by-Step Instructions
1. Create or Identify the Option Set and Its Values
Identify/Define Your Option Set:
- Go to the Dataverse area, select the relevant table, and identify or create the option set that requires filtering.
- Note down the values and corresponding labels, which will be essential for your filter logic.
2. Create the JavaScript

Draft Your JavaScript Code
function manageFormControls(executionContext) {
    var formContext = executionContext.getFormContext();

    // Hide specific options in the field
    var optionField = formContext.getAttribute("LOGICAL NAME");
    if (optionField) {
        var optionsToHide = [OPTION VALUES];

        optionField.controls.forEach(function (control) {
            control.getOptions().forEach(function (option) {
                if (optionsToHide.includes(option.value)) {
                    control.removeOption(option.value);
                }
            });
        });
    }
}
Ensure the code captures the conditions under which each option is to be displayed or hidden.
Update Code Accordingly
- LOGICAL NAME: Replace this text with the logical name of the option set field you want to hide options on (for example: customertypecode, statecode, pub_customfield).
- OPTION VALUES: Replace this text with a comma seperated list of the values you wish to hide. The code must containt he VALUES, not the LABELS (for example: 1, 2, 3).
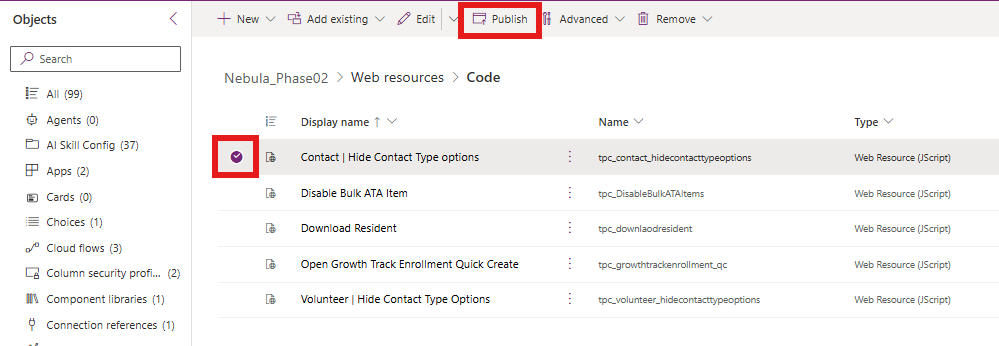
3. Publish Web Resource
Unfortunately, just saving your web resource is not enough. You must also publish else your code will not work properly!
Select the web resource you just created and select the Publish button in the ribbon.
4. Add Library to Form Events
Add the JavaScript Library to Your Form:
- Open the Form editor
- Select ‘Events’ in the right hand properties pane.
- Select “+ Event Handler”.
- Select the web resource as the library.
- Set the function to manageFormControls. This is what is defined in the sample above. You may need to update this if you updated the function name in your code.
- Check Enabled and check Pass execution context as first parameter.
- Select Done.

4. Publish Form
Save and Publish Your Form:
- After configuring the JavaScript library and events, save your changes in the Form Editor.
- Ensure that all configurations are correctly applied, and then publish the form to make the changes live.
- Test your form to ensure that the option set filtering functions as intended.
Tips and Best Practices
- Test Extensively: Check the filtering functionality across multiple scenarios to ensure consistency and reliability.
- Documentation: Maintain clear documentation of the JavaScript code and logic for reference and future updates.
- User Feedback: Gather feedback from end-users for further refinement, ensuring the filtering mechanism enhances the form’s usability.
Conclusion
By using JavaScript to filter option sets in Model-Driven Apps, you enrich the user interface and improve decision-making processes by displaying only relevant options. Through rigorous testing and user feedback, this guide equips you with the essential steps to optimize your app’s functionality. Now it’s time to implement and tailor these instructions to suit your app’s unique requirements.
Happy coding!