In this tutorial, we’re going to delve into a practical implementation of opening a Quick Create form using a ribbon button in Microsoft Dynamics or Power Platform Model-Driven Apps. This guide will be particularly useful for those aiming to streamline user workflows by setting up efficient, fast-access forms directly from the navigation of their app interface.
What You’ll Learn
- Integrating JavaScript to open Quick Create forms.
- Setting up ribbon buttons in Model-Driven Apps.
- Implementing best practices for button-triggered actions.
Why This Matters
Opening a Quick Create form using a ribbon button is a convenient feature that enhances user productivity by allowing quick entries and modifications directly from the app’s interface. This method reduces time spent navigating through multiple screens and provides instant access to essential operations, thereby improving workflow efficiency and user satisfaction in business processes.
Step-by-Step Instructions
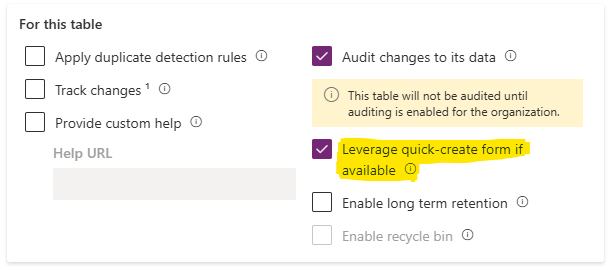
1. Confirm that Table is Enabled for Quick Create
Tables must be “Opted Into” leveraging Quick Creation. Navigate tot he table settings and under advanced settings, you will find the option Leverage quick-create form if available.
You then need to ensure that a Quick Create form exists for the entity and the form is added to the app. If neither of these are true, you will have issues loading the Quick Create form.
2. Create the JavaScript Function

Begin by crafting a JavaScript function that triggers the Quick Create form. Below is a sample script to get you started:
function OpenRecord(primaryControl) {
    if (typeof Xrm !== "undefined" && Xrm.Utility && Xrm.Utility.openQuickCreate) {
        Xrm.Utility.openQuickCreate("TABLE SCHEMA NAME").then(
            function (success) {
                console.log(success);
            },
            function (error) {
                console.log(error);
            }
        );
    } else {
        alert("Error Loading Quick Create Form");
    }
}- Replace the “Table Schema Name” with the table’s schema name. Be sure to include the quotation marks.
- Ensure its availability across the forms you intend to modify.
3. Publish the JavaScript as a Web Resource
Save your JavaScript function and publish it as a web resource within your Power Apps environment.

4. Define the Ribbon Button
- Navigate to the Model Driven App Editor in your Power Apps environment.
- Select the table that the button should exist on. This is what defines which “Ribbon” you want the button to be.
- Select the ellipses and then the Edit command bar.
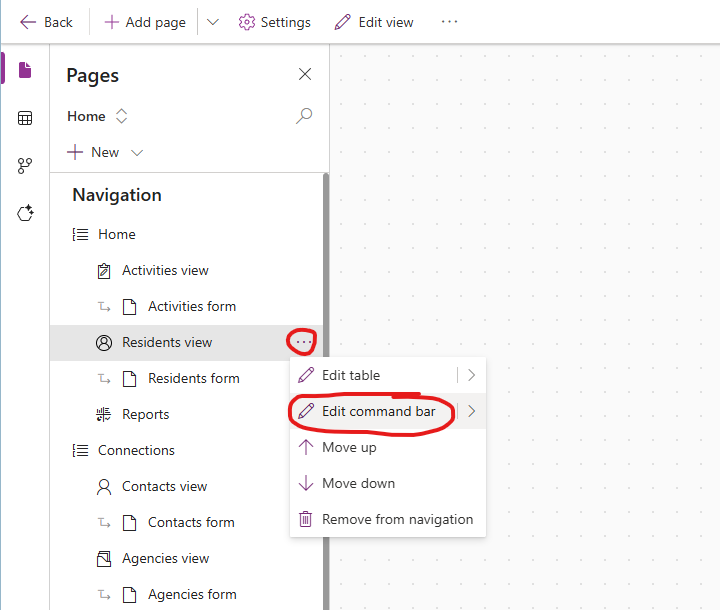
- Select the ribbon in which you wish to add the button to. Buttons display when looking at a list of records in a view (Main grid), when looking at the main form of a single record (Main form), when looking at records in a subgrid (Subgrid view), or when looking at records in the associated tab of a related record (Associated view).
- Select the New button and the Command to add a command button.

- Define the button’s Label and Icon
- Set the Action to Run JavaScript.
- Select the Web resource created above in the Library.
- Set the function to OpenRecord. This is what was defined in the sample code above. If you modified the function name, be sure to add the correct value here.
- Add the Tooltip title, description, and accessibility text as neccessary.
- Save and Publish the ribbon updates.
5. Publish & Test the Button Functionality
- Publish your customizations to make them live.
- Test the newly added button to ensure that it triggers the Quick Create form correctly.
- Double-check that the form opens as expected and that all necessary fields are displayed.
Tips and Best Practices
- Testing: Always perform thorough testing in a non-production environment to catch any errors before going live.
- Documentation: Keep well-documented records of your JavaScript logic and ribbon configurations. This will come in handy for future updates or when troubleshooting.
- User Feedback: Gather feedback from end users on the functionality and user interface improvements to refine the implementation further.
Conclusion
By following these steps, you can effectively add a Quick Create form that users can access through a ribbon button, vastly improving navigational efficiency and ease of data entry in Microsoft Dynamics and Power Platform Model-Driven Apps. This integration not only aids users in speeding up their processes but also enriches the overall user experience by offering quick, reliable ways to interact with critical data.
Happy coding as you implement these enhancements to your Power Platform projects!