Adding Microsoft Copilot to your website transforms user interaction, offering dynamic, AI-driven assistance that enhances user engagement and streamlines support. With this step-by-step guide, you’ll learn how to configure and embed Copilot on your site to maximize its potential for customer engagement and operational efficiency.
Why Add a Copilot to Your Website?
Incorporating a Copilot on your website offers numerous benefits, both for your visitors and your business operations. Here are some reasons why adding a Copilot might be the right choice:
- Enhanced User Engagement: A Copilot can interact with your website visitors in real-time, offering personalized assistance that keeps users engaged and improves their overall experience.
- Streamlined Customer Support: Reduce the workload on your support team by using Copilot to handle common queries, provide quick answers, and guide users to relevant resources.
- 24/7 Availability: Unlike human agents, a Copilot is always available, ensuring your visitors can get help or information at any time, even outside business hours.
- Improved Conversion Rates: By offering instant assistance, Copilot can help reduce drop-offs, answer questions about products or services, and guide users towards making purchases or completing actions.
- Customizable Interactions: Tailor your Copilot to align with your brand’s tone, messaging, and specific user needs, creating a cohesive and memorable experience.
How to Add Microsoft Copilot to Your Website
Step 1: Prepare Your Copilot in Microsoft Copilot Studio
Before embedding Copilot on your website, ensure you have already created and tested your Copilot in Microsoft Copilot Studio. If you haven’t built one yet, refer to our guides on How to Create a Microsoft Copilot for step-by-step instructions.
Access Your Copilot
- Log in to Microsoft Copilot Studio.
- Select the Copilot you’ve already created. For this guide, we’ll use a “Coffee Shop Copilot” as an example.
Step 2: Configure Authentication Settings
Authentication determines whether your website visitors need to log in before interacting with the Copilot.
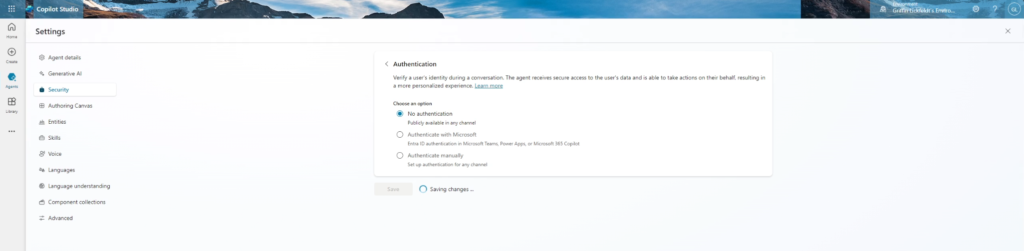
- Navigate to Settings > Security > Authentication.
- Decide on the authentication type:
- No Authentication: Ideal for external websites where anyone can use the Copilot.
- Authentication Required: Use this for internal tools or scenarios where sensitive information is involved.
- Save your settings after making the selection.
Tip: For public-facing websites, “No Authentication” is the easiest option to provide seamless user interaction.

MASTER COPILOT STUDIO AGENTS
Get the 10 Commandments of Copilot Agents (Free)
Want to learn the Pro Tips of Copilot Agents? Get this free resource sent right to your inbox.
Step 3: Publish Your Copilot
Publishing ensures your Copilot is accessible through external channels.
- Go back to your Copilot in Copilot Studio.
- Click the Publish button to push any updates live.
Important: If you’ve made changes to your Copilot, ensure you publish it to reflect those updates.
Step 4: Generate the Embedding Code
Once your Copilot is published:
- Navigate to the Channels tab in the top-right corner of Copilot Studio.
- Select the Custom Website option.
- Copy the HTML embedding code provided.
- The key element here is the unique Copilot URL within the snippet.

Security Note: Treat the embedding code as sensitive information. Unauthorized access to this code can give others the ability to interact with your Copilot.
Step 5: Add the Copilot Code to Your Website
Now it’s time to integrate Copilot into your website.
- Open your website’s HTML file or content management system (CMS) editor (e.g., WordPress, Wix).
- Paste the embedding code into the section of your website where you want the Copilot to appear.
- For example, you might place it in your website footer or a dedicated support page.
- Save your changes and refresh your website to ensure the Copilot appears.
Tip: Customize the surrounding HTML to match your website’s branding and layout.
Step 6: Test the Copilot
Before going live, test your Copilot to ensure it functions correctly.
- Open your website in a browser.
- Interact with the Copilot to confirm:
- The interface loads properly.
- The responses align with the logic you set in Copilot Studio.
- There are no unexpected errors.
Benefits of Embedding Copilot on Your Website
- Improved User Engagement: Offer instant, AI-driven assistance.
- Enhanced Support: Answer common customer queries, reducing reliance on live agents.
- Customizable Experiences: Tailor responses to align with your brand’s tone and messaging.
Use Cases for Copilot on a Website
A Copilot can be a versatile tool, fitting into various industries and website types. Here are some common use cases:
- E-Commerce Support:
- Help visitors find products by answering queries about inventory, specifications, or pricing.
- Assist with tracking orders or navigating return policies.
- Service-Based Businesses:
- Provide instant answers about services, appointment scheduling, or pricing.
- Direct users to contact forms or booking pages based on their needs.
- Educational Platforms:
- Guide students to relevant courses, resources, or FAQs.
- Answer questions about registration, deadlines, or certifications.
- Internal Portals:
- Act as an internal assistant for employees, helping them find documents, manage schedules, or complete HR-related tasks.
- Healthcare Websites:
- Offer initial guidance on healthcare services, location details, or appointment bookings.
- Share general information on symptoms, treatments, or insurance policies.
- Technical Support Sites:
- Troubleshoot basic issues and guide users to advanced solutions or live agents.
- Provide software documentation and quick tips.
In Conclusion
By following these steps, you can successfully add Microsoft Copilot to your website and provide your visitors with an AI-powered assistant. Whether you’re running an e-commerce store or a service-oriented platform, integrating Copilot can elevate your user experience and streamline support efforts.
Thanks for reading. Happy Developing!