Unlock the full potential of Microsoft Dynamics 365 Copilot with Agent Experience Profiles! In this comprehensive tutorial, we’ll guide you through optimizing your Copilot usage by tailoring configuration settings to fit your organization’s specific needs. Discover how to enhance productivity, streamline workflows, and maintain control over Copilot access for your users. By implementing these strategies, you can mitigate risks associated with generative AI reliance while empowering your team to leverage Copilot’s capabilities effectively. Join us as we explore step-by-step instructions and best practices for creating Agent Experience Profiles that maximize efficiency and minimize misuse.
In a world where productivity reigns supreme, Copilot stands as a beacon of efficiency. Yet, despite its potential, many organizations hesitate to embrace its full capabilities. Why? Well, there’s a lingering fear of employees overly relying on generative AI, potentially leading to costly mistakes or a decline in motivation.
But fear not! Microsoft has heard these concerns and presents a solution: Agent Experience Profiles. Think of them as security groups tailored to suit your organization’s needs. With Copilot in Microsoft Dynamics, it’s not a one-size-fits-all approach. Instead, you have the flexibility to group licensed users and customize Copilot privileges for each group.
But how exactly does this work? Let’s delve into the nitty-gritty of explaining what Agent Experience Profiles are and how to set them up.
What are Agent Experience Profiles?
The issue is straightforward: Not all users within an organization may require—or should have—access to all of Copilot’s capabilities. Yet, herein lies a dilemma—Copilot cannot be selectively enabled for specific users. Instead, it must be activated for the entire organization, with certain capabilities then revoked from individual users as needed.
Enter Agent Experience Profiles—a strategic solution to this conundrum. These profiles offer a nuanced approach, allowing organizations to tailor Copilot privileges to suit specific user groups. With Agent Experience Profiles, you can ensure that only those who truly need access to Copilot’s capabilities are granted permission, optimizing efficiency while minimizing potential misuse.
In the following sections, we’ll delve deeper into the intricacies of Agent Experience Profiles, exploring how they enable organizations to strike the perfect balance between maximizing Copilot’s benefits and maintaining control over access. Join us as we unravel the secrets to unlocking Copilot’s full potential while mitigating any associated risks.
When do you need Agent Experience Profiles?
First things first—you can create as many Agent Experience Profiles as your heart desires. However, it’s often recommended to align these profiles with individual security roles, departments, or business units. For instance, in our upcoming demo, we’ll be setting up a profile for two Customer Service Representatives, showcasing the versatility of this approach.
Now, picture this scenario: You want certain users to access Copilot’s Productivity Pane, but not everyone needs this feature. No problem! With Agent Experience Profiles, you can easily tailor access permissions to meet your specific needs.
But wait, there’s more. What if you have concerns about certain capabilities being misused? Say, for example, you prefer your legal team to steer clear of Copilot’s Draft Email capabilities. Fear not—Agent Experience Profiles allow you to fine-tune access rights, ensuring that each user group only has access to the features relevant to their role.
Of course, we could talk about the various capabilities all day long. But enough chatter—let’s dive into Dynamics and see Agent Experience Profiles in action. It’s time to witness firsthand how this innovative tool can revolutionize your workflow while maintaining control and security. Let’s get started!
How to Create Agent Experience Profiles
1. Navigate to the Customer Service Admin Center
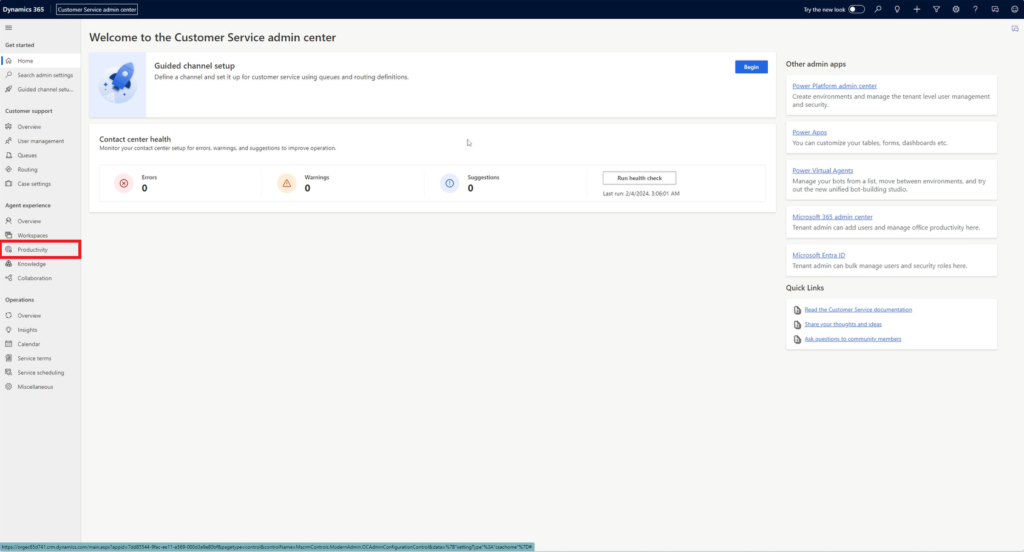
The first step on our adventure? Navigating to your organization’s Customer Service Admin Center. Now, I’m doing this in the Power Apps Maker portal, but the beauty of it is that it doesn’t matter how you get there. Once you’ve arrived, you’ll be greeted with a screen that looks something like this.
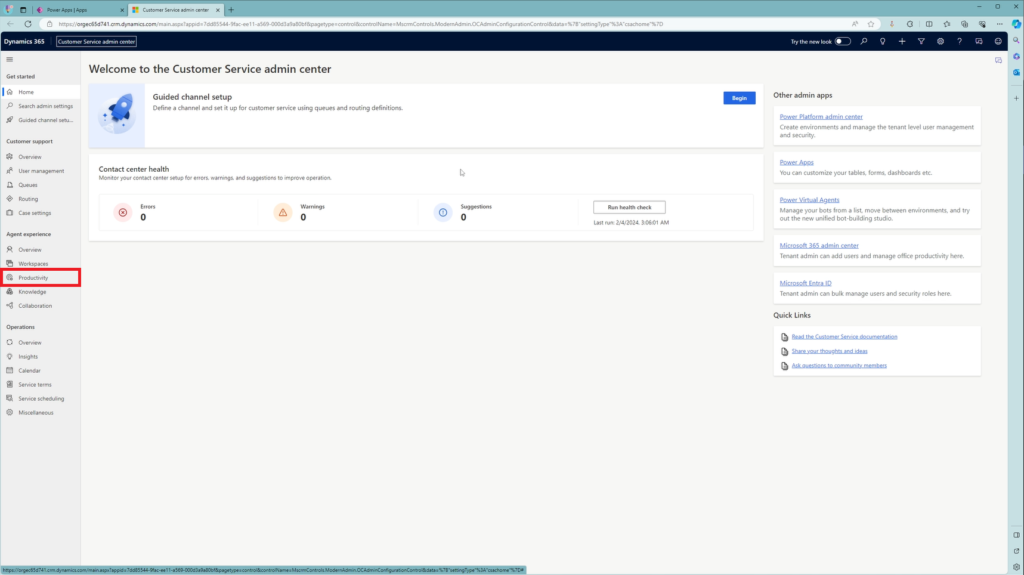
2) Manage the Copilot Help Pane
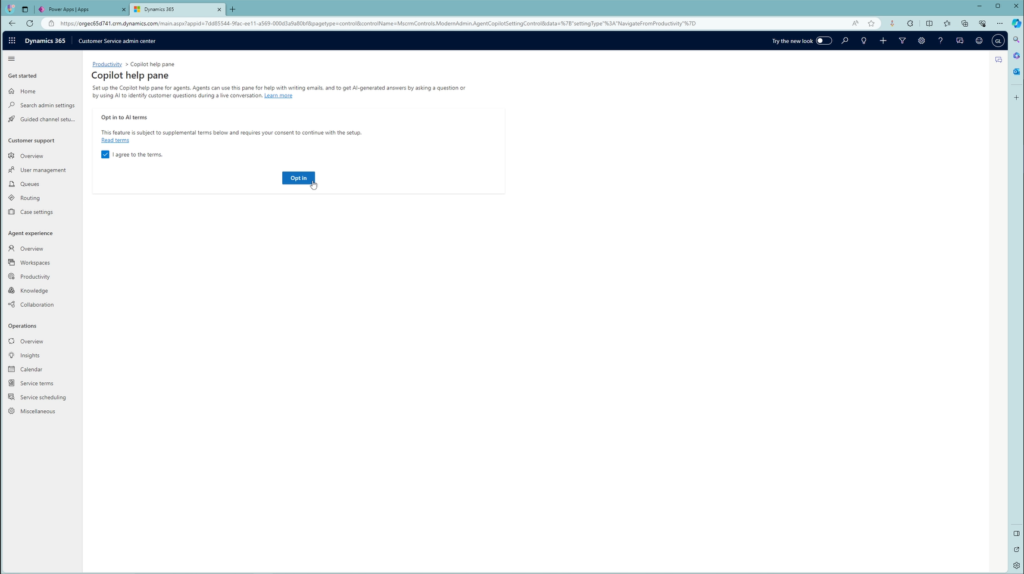
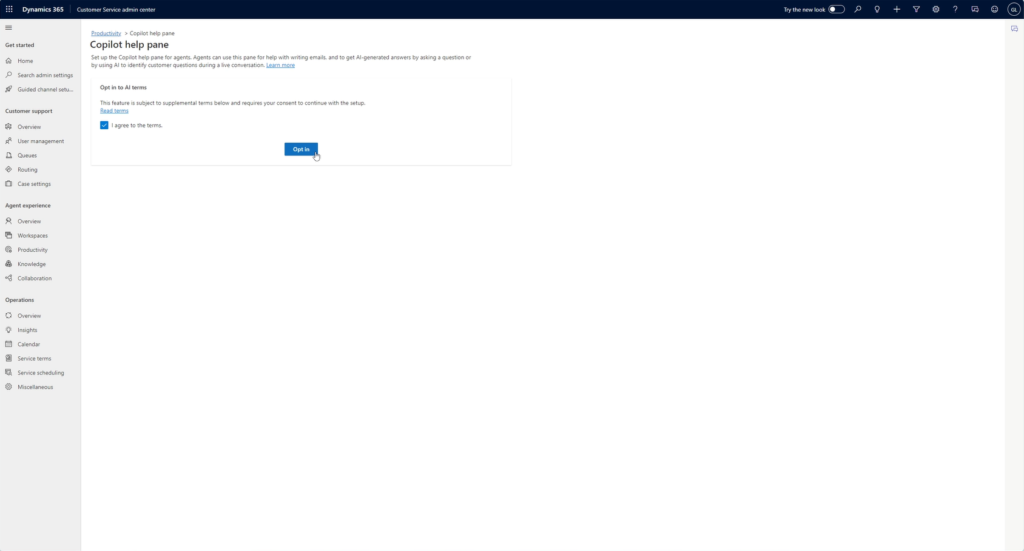
On the left-hand side, nestled snugly in the sitemap, you’ll spot a section called “Agent Experience.” Click on Productivity, and you’re off to the races. But hold on—where are those elusive Agent Experience Profiles hiding? They’re not here, my friend. Instead, you’ll need to venture into the Copilot Help Pane section. Click Manage, and if you haven’t already, you’ll need to opt in for your organization (pictured below). Don’t worry; it’s a one-time thing and applies organization-wide. If you don’t see this screen, it simply means someone beat you to the punch.
Now, if you’re itching for more details on how to further configure the Copilot Help Pane, I’ve got you covered with a post here. Check it out for a deeper dive. Once you’ve made your changes, don’t forget to hit save.

MASTER COPILOT STUDIO AGENTS
Get the 10 Commandments of Copilot Agents (Free)
Want to learn the Pro Tips of Copilot Agents? Get this free resource sent right to your inbox.
3) Create an Agent Experience Profile
Ah, but what’s this? Behold—the Agent Experience Profiles section! Here, you’ll find some premade profiles with nifty configurations. I’d recommend giving these a once-over to see if they fit your business needs. However, for today’s demo, we’re going rogue and creating one from scratch.
Hit “New” in the ribbon, and voila—the create window appears. You’ll need a name and a unique name to get started. And as a best practice, be sure to fill in a description too. After all, it’s the little details that make all the difference.
And there you have it—a sneak peek into the world of Agent Experience Profiles. Let’s talk about the different components that make up these Profiles
What makes up an Agent Experience Profile?
Here’s a breakdown of the six sections you’ll encounter on this page, each playing a crucial role in shaping your Copilot experience.
User Selection
This section allows you to specify which users will fall within this agent security profile. Keep in mind that users can only be added to a single Agent security profile. Once added, they’ll display in the subgrid on the form. While it may seem daunting for organizations with thousands of users, there’s currently no alternative method available.
Entity Session Templates
Entity session templates define the session experience in Omnichannel for Customer Service. Essentially, they dictate the tabs that open and close for your Omnichannel agent. You can select from pre-built templates or create your own to tailor the experience to your needs.
Productivity Pane
You see, in order to access the Copilot Help Pane, users must first have the Productivity Pane enabled. Once enabled, a plethora of options become available within the Productivity Pane settings. However, if you’re keen on utilizing the Copilot Help Pane, there’s a specific switch you need to toggle.
For our scenario, it’s advisable to enable additional features such as Agent Scripts and Knowledge Search alongside the Copilot Help Pane. These functionalities complement each other seamlessly, providing agents with a comprehensive toolkit to streamline their workflows and enhance customer service delivery.
Inbox
Here, you can customize the views available to your agents when they access the Customer Service workspace or Omnichannel for Customer Service. For example, you can hide specific views, like Closed Work Items, to streamline the interface.
Channel Providers
This section allows you to set which communication channels are included in the Agent Experience Profile. Supporting different channels in your business support offering is crucial for providing personalized service to customers across various platforms.
Copilot AI Features
Here’s where the magic happens! Currently, for customer service, there are two main Copilot features: the Copilot Help Pane and Copilot Summaries. The Help Pane assists agents in finding answers to customer queries or drafting responses, while Summaries streamline case record or conversation reviews.
Keep in mind that enabling Copilot features requires enabling them for the entire organization and then removing privileges from specific users. Once you’ve customized your preferences, don’t forget to save and close. Voila!
You’ve successfully configured your Agent Experience Profile, unlocking the full potential of Copilot within Dynamics. Stay tuned for more insights and tips as we continue our journey through the world of Copilot integration.
In Conclusion
As we draw the curtains on our exploration of Copilot integration within Customer Service and Dynamics 365, it’s evident that we’ve only just scratched the surface of its vast potential. While we’ve delved into the intricacies of Agent Experience Profiles, Entity Session Templates, and Copilot AI features, there’s still a wealth of functionalities waiting to be discovered.
But fret not if you’re hungry for more knowledge! Our journey doesn’t end here. To delve deeper into the myriad capabilities of Copilot within Customer Service and Dynamics 365, I invite you to check out our comprehensive guide here.
Happy Developing!