When building a Copilot AI assistant in Microsoft Copilot Studio, creating entities is essential for capturing specific user data like phone numbers, coffee sizes, or dates. Entities define how your assistant processes and understands user inputs, ensuring smoother and more accurate interactions. In this guide, we’ll walk you through the process of setting up entities to help your Copilot assistant recognize and store relevant information effectively.
What Are Entities in Copilot Studio?
Entities are the building blocks that define the type of data your assistant will capture. Think of them as “rules” that tell your Copilot bot how to understand and process user inputs.
For example:
- A phone number entity specifies that the data should follow a specific format (e.g., XXX-XXX-XXXX).
- A coffee size entity allows your assistant to recognize user preferences for small, medium, or large coffee.
Entities work in conjunction with variables and topics, and can be used across your entire Copilot assistant.
Step-by-Step Guide: Creating an Entity in Copilot Studio
1. Navigate to Your Copilot Studio Project
Open the Copilot Studio interface and choose your desired project (e.g., Coffee Ordering Assistant).
On the right side, click the Settings button. If you can’t see it, look for the three dots and select Settings from there.
2. Access the Entities Tab

- Once in Settings, locate and select the Entities tab.
- Here, you’ll find a list of pre-built entities such as emails, dates, and phone numbers.
3. Create a New Entity
- Click Add New Entity to start creating a custom entity.
- For example, if you’re building a coffee ordering assistant, name your entity “Coffee Size.”
- In the description field, use natural language to define the purpose of this entity. For example: This defines the size of coffee a customer wants to purchase (e.g., small, medium, large).

MASTER COPILOT STUDIO AGENTS
Get the 10 Commandments of Copilot Agents (Free)
Want to learn the Pro Tips of Copilot Agents? Get this free resource sent right to your inbox.
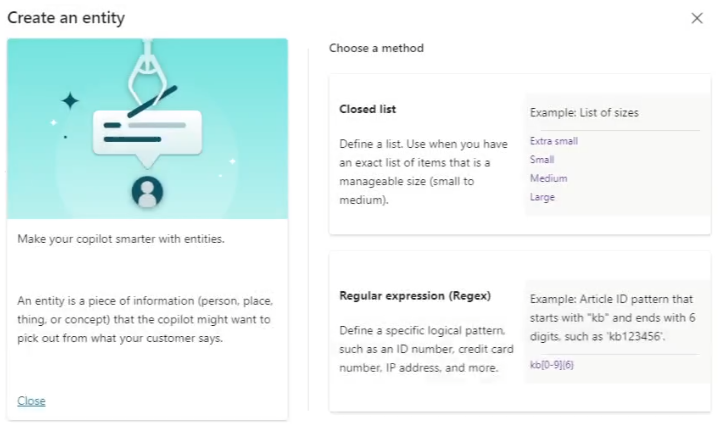
4. Choose Entity Type
You can create two types of entities:
- Closed List: A set list of predefined options (like coffee sizes).
- Regular Expression: For more complex patterns, such as phone numbers or article IDs.
For this example, select Closed List since we are defining coffee sizes.
5. Add Values to Your Entity
Enter the values for the closed list. For instance, type “small,” “medium,” and “large” as the available coffee sizes. Optionally, enable Smart Matching to help the AI handle common misspellings or grammar issues.
6. Save and Use the Entity
Click Save to finalize your entity. Your new entity is now ready to be used across different topics or variables in your Copilot bot.
Why Use Entities in Copilot Studio?
Entities help your Copilot bot understand and categorize user inputs in a structured way. By defining what different types of information look like (e.g., a phone number or coffee size), the bot can quickly process and respond to user requests without asking redundant questions.
Pro Tips for Better Entity Setup:
- Smart Matching: Enable this feature to handle misspellings or varied phrasing.
- Be Clear in Descriptions: Clearly explain the context of the entity (e.g., coffee size).
- Test Your Entity: Run simulations to ensure your Copilot AI recognizes the entity correctly.
In Conclusion
By setting up entities effectively, you’ll improve the efficiency of your Copilot assistant, reduce redundant interactions, and provide a smoother user experience.
Thanks for reading. Happy Developing!