In the world of Power Automate, mastering the Run After feature is essential for optimizing your workflows and ensuring seamless automation. This powerful tool allows users to configure actions based on the outcomes of previous steps, such as success, failure, skipping, or timeout scenarios. By implementing the Run After feature, Microsoft developers and business process consultants can enhance their automation strategies, making their flows more resilient and adaptive to real-world complexities. In this comprehensive guide, we’ll explore how to leverage the Run After functionality effectively, enabling you to bulletproof your Power Automate workflows and drive efficiency in your daily tasks.
In Power Automate, the Run After feature allows you to configure specific actions to be invoked. This is based on the outcome of a previous action. Microsoft developers and CE consultants utilize this feature, but it can be incredibly useful in complex situations.
Each action in Power Automate stores information about its outcome, such as whether it was successful, failed, skipped, or timed out. Depending on this information, you can configure your following actions to perform specific tasks. By default, the Run After feature triggers an action only when the previous action is successful. This is indicated by a green checkmark.
However, if you want to invoke a specific action when the previous action fails, you can use the Run After feature to configure this behavior. This can be especially useful in real-world scenarios and different client projects.
What are the Run After options?
In Power Automate, there are four options to choose from when configuring the Run After feature:

- Is successful: This option triggers an action only when the previous action runs successfully.
- Has failed: This option triggers an action when the previous action fails, except for timeouts.
- Is skipped: This option triggers an action when a previous action is skipped. Actions are skipped either when a condition is not met or when a previous action fails.
- Has timed out: This option triggers an action when a previous action times out.
Side Note: The duration for an action to time out in Power Automate depends on the action itself. Each action has its own timeout settings, which can be configured to increase or decrease the timeout duration. For example, the default timeout for the Do Until action is one hour.
How do I set an Action’s Run After?
To configure the Run After feature in Power Automate, follow these steps:
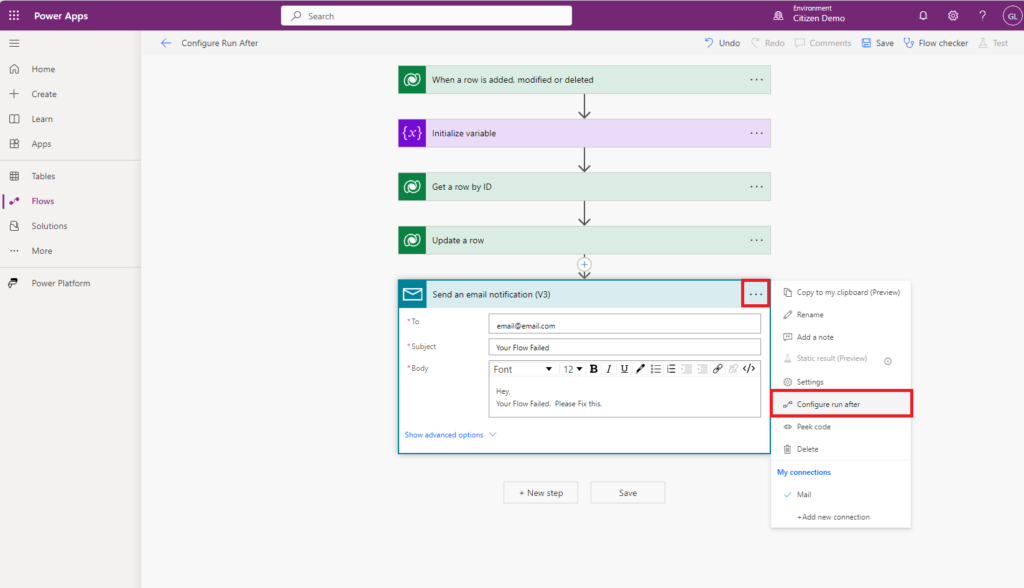
- Find the step that you want to configure Run After for and select the ellipsis (three dots).
- Select Configure Run After from the menu.
- Select the outcome of the previous action that you want to trigger the next step and select OK.
That’s it! You have now successfully configured Run After for your Power Automate flow. Once you have set the Run after to anything other than Is successful you will see that the action will now have a red arrow pointing to it, indicating that this has a different run after set.
How do I Configure the Run after in the new Designer?
The capabilities to utilize Run after in Power Automate are not left in the dust when utilizing the new Power Automate Designer. When selecting an action, in the left window, you can navigate to the actions “settings” tab.

Within this Settings tab, you will find a Run After section. Here you can actually outline several actions is neccessary, as opposed to only the previous action. If you select the carrot icon next to an action, then the same 4 options for the run after will be listed. You can still select one, or more than one.

What are some use cases for Configuring the Run After?
#1 Business Critical Flows
Imagine, in Power Automate, you have a business-critical flow or a flow that is crucial to a fundamental business process. This process has an action that needs to happen no matter what. You should use the Configure Run After feature to ensure that your business-critical step is still executed even if a previous action fails.
This allows you to automate a specific action to occur only if another action develops in a certain way. For example, if you create a row or update a row or notify someone, etc., you can configure the Run After feature to ensure that even if a previous action fails or a series of previous actions fail, your business-critical step is still executed.
#2 Flow Error Handling
In Power Automate, configuring the Run After feature is helpful for error handling. I have had experience on a project where we utilized this on every flow. If a flow run failed, we would add the information of that flow run to an Excel doc and share it on a daily basis with the client’s support team.
To achieve this, you can use a handy little action called a Scope action. The orange scope control is simply a container that does not add any code to your actions that are within the scope. However, this can be really handy because you can configure Run After for if the scope now fails. So how is that different than using a configure run after for just a previous action? Well, now if several actions are in the scope, and any of those actions in the scope fail, then the scope container is going to fail, which is then going to intern trigger the configure run after “if failed” action.
To take this one step further, you can even create a second scope and call it error handling. If you want multiple actions to be taken if a flow fails, say we want to send an email and we want to update or add a row to an Excel dock of the flow run. Now if we configure the Run After on our error handling scope, we can set it to be failed.
#3 Parallel Actions
In Power Automate, parallel actions are when you have several actions taking place simultaneously. If you need a specific action to happen only if both parallel simultaneous actions are successful, or if both simultaneous actions have failed, you can use the Configure Run After feature to work for parallel actions as well.
In Conclusion
The Configure Run After feature in Power Automate is a powerful tool that allows you to automate complex tasks and ensure that your flows run smoothly. By using this feature, you can trigger specific actions based on the outcome of a previous action, such as success, failure, skip, or timeout. This can help you handle errors, parallel actions, and business-critical steps in your flows. By taking advantage of this feature, you can save time and improve your productivity.