Starting a new D365 Trial Environment is essential for CE consultants and Power Platform developers looking to explore Microsoft Dynamics 365 capabilities. This step-by-step guide will walk you through the process of creating a robust and stable environment that allows for experimentation with the latest features and applications in Microsoft 365. With our easy-to-follow instructions, you’ll learn how to obtain an Office 365 E5 license, set up your Power Apps environment, and manage your licenses effectively, ensuring a seamless experience. Whether you’re interested in D365 Sales, Power Platform integration, or enhancing your understanding of Microsoft Dynamics 365, this tutorial covers everything you need to get started and maximize your trial period.
As a CE consultant or a power platform developer, you need to know how to create environments. This gives you stable and reliable spaces to explore and experiment new features.
In this post, we will show you how to do this step by step. Don’t miss the bonus tip at the end of the post below. Also, remember that this is the latest way to create these environments. You should bookmark this page by clicking the star icon in your browser. This will help you access it again when your trial expires.
I won’t go over the first step, which is making a new browser profile. I’m using Edge with a fresh profile. If you have one too, the next thing is to go to this website link below.
Office 365 E5 – Enterprise Solution Upgrade from E3 | Microsoft
How to Create an Office 365 E5 License

To proceed, click on the “Try for Free” button located on the website. After clicking on “Try for Free,” you will be redirected to a page where you need to enter your email address. I recommend using your personal email address, as I have done so in the past without any issues. Click on “Set up account” to continue.
You will then be taken to a page where you can provide details about yourself. Feel free to be honest or use your own information. When entering the company name, choose a unique name that is not already in the system. I usually create a name followed by a series of numbers.

Finally, indicate the size of your company. In my experience, it does not matter which one you select here. I tend to select two to four, but this is not going to limit your system in any way. This information is for Microsoft’s record keeping and does not matter much.
If you would like to receive more information from select partners, you can opt-in. However, I don’t ever check that option.
After providing all the necessary details, you find yourself on a verification page.
Account Authentication
To proceed, enter your phone number and click on the send verification code button. Once you receive the verification code, enter it in the designated field. Sometimes, an error message appears stating that the code cannot generate due to a high volume of requests. In such cases, the only suggestion I can offer is to repeatedly request a new code by clicking on the “send me code” option. I have personally had to do this for approximately ten minutes in the past.
You will receive the verification code in due course. If you encounter the mentioned error, it is not due to any mistake on your part and there is no workaround available. After obtaining the code, you can proceed with the verification process. Consequently, your first and last name, along with your company name and on.microsoft.com, will serve as your user’s email and account.
Please enter any desired password and proceed by clicking “next”. A message will appear stating “Creating account”. Please refrain from refreshing the page. Following this, you will end up on a page containing payment information and the option to finish. The monthly cost per user is $38. Please note that you will need to provide your payment details, but rest assured, Microsoft will not charge you anything.
It is just an additional verification step by Microsoft to prevent bots from accessing the trial after it expires. No charges or renewal will occur, the trial will simply be closed.
Proceed to complete the verification form and save it. The “total amount today” will be zero. To start the trial, click on “Start Trial” button. You have now successfully signed up for the Office 365 trial. Click on “Start using Office 365 trial” to proceed. This will take you to the Microsoft 365 admin portal specifically for your trial.
How to Purchase Licenses in Microsoft 365 Admin Center
Navigate to the Microsoft 365 admin center. You may encounter a series of initial steps. Please utilize the default domain it provides if you do not possess your own domain. This is the platform where you can add users and allocate licenses. If you have multiple individuals who require access to the demo environment, you can add them here. If you choose not to add users at this moment, you can still add them at a later time.
After filling out all of the items as desired, click on continue and then proceed to go to the Admin Center.
After getting acquainted with the Admin Center, proceed to the top left and access the Marketplace. If you already have a license, your left hand window will look different. You will need to first select Billing and then select Purchase services.

From there, search for “dynamics services” and you will find D365, which offers various services. For our example, locate the Dynamics 365 Sales Premium service.
After searching, we can find the D365 Sales Premium license. For your license, select Details. Then select Start free trial next to the “Buy” button
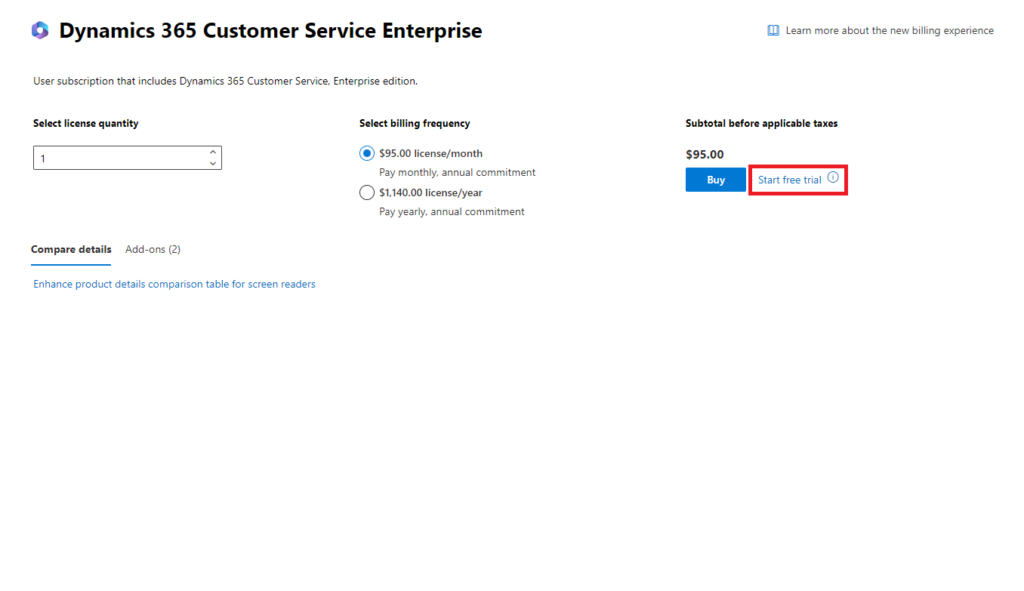
This is going to bring you to a checkout type screen. Go ahead and select Try now. After selecting that it will likely show you an “order receipt” screen. Go ahead and click Continue.
So now, if you were to go to billing and your products, you should see your new trial here with your Office 365 E5 trial.
How to Turn Off License Recurring Billing
IMPORTANT NOTE: Ensure that any license you sign up for has the “Recurring Billing” turned off!
Occasionally, Microsoft could set your trial subscription to have Recurring billing turned on. If this is on, when your trial expires, Microsoft will charge you automatically on the date your trial ends and renews! You will get an email notification to your personal email (or the email you used in your trial set up) two weeks before notifying you of the upcoming renewal.
To turn Recurring billing off, navigate to the Microsoft 365 admin center > Billing> Your products. When looking at your list of subscriptions, if the Subscription status is set to “Renews on ##/##/####”, then the recurring is on. In the screenshot below, you can see that my Office 365 E5 Trial is set to recur on 11/12/2023.
To fix this, open the License with Recurring billing turned on and select the Edit recurring billing in the Trial subscription section. Selecting this will open up a side pane where you can set the billing from on to off. Be sure to save your changes.
Your license will now read “Expires on ##/##/####” when the recurring billing is turned off. If recurring billing is turned off, than your trial subscription will expire. This way Microsoft will not charge you.
How to Create a new Environment in Power Platform Admin Center
Now, at this point, you should navigate to the Power Platform admin center. Once you are here at the Admin Center, it may ask you to select Get Started.
You’re going to get this nice, lovely welcome screen on the home page. Go ahead and select Environments in the top left. You will find that you have a default environment automatically created for you, but it does not contain any applications at the moment. Generally, it is not preferable to work with the default environment, so we should create a new one. Let’s proceed by selecting “New”.
Creating a new Environment
Set a name for you new environment and ensure that your region is accurate. It is then crucial to change the type from Sandbox to Trial (subscription-based). I usually use the Trial (subscription-based) instead of the Trial option. Please proceed by clicking Next since there is nothing else to fill out.
You will now be directed to a second page. Please ensure that your language and currency settings are accurate. Note: you cannot update these later, once this has been set. Then, you will notice that a security group is necessary. Proceed by clicking on “select” and choose the Restricted Access Security group for your tenant.
Before clicking Save, it is crucial to enable D365 apps. To do this, swipe the toggle to “yes” and the apps will automatically deploy. You can choose which apps you want to deploy. I tend to utilize all enterprise applications at the highest level. You have the option to choose a different one, but I suggest using all enterprise applications for a trial environment. This will provide you with more capabilities in your demo environment, rather than being restricted to just one application.
Go ahead and hit Save.
After completing the process, you will be returned to a screen where you will notice that your environment is initially in the preparing state. Note that this preparation process may take up to 15 minutes. Feel free to take a break, grab a cup of coffee or some water, and return to the screen. Once you hit the refresh button, you will be able to navigate through the environment.
If you then navigate to the Power Apps Maker Portal, you may find that your environment is not in the drop down selector. This can take up to 15 minutes, after being processed, for it to show up here.

How to Extend a Trial License
In your Microsoft 365 admin center, navigate to Billing on the left hand side, then select Your products.
You can easily see the active expiration date for each license. To extend the end date, simply click on the license and then click on the “extend end date” option.
You need to confirm your “payment method” and then select Extend trial again. This action will not require any payment. Once you click on Extend trial, you will see that the end date has been successfully updated and now shows a month later. Repeat this process for other trial licenses as well.